This post describes how to configure Cakewalk Sonar with Helix Native and how to program the FCB1010 to control activation of preset snapshots within Helix Native. This description only discusses programming the FCB1010 to change Helix Snapshots.
RELEVANT HARDWARE AND SOFTWARE:
Hardware:
– Roland Duo-Capture for midi input
– Behringer FCB1010 Midi Foot Controller
Software:
– Helix Native
– Cakewalk Sonar (DAW)
– (optional) MidiOx for monitoring midi in/out
CAKEWALK SETUP
1) Start a new project in Sonar. NOTE: Start with a blank project. Some of the predefined Sonar projects have audio tracks that are already linked to a midi track.
2) Add an Audio track and Midi track.
3) In the Audio track, add Helix Native as an audio effect in the FX pane.
Helix Native panel should now be open. While it is open, select the VST dropdown and then select Enable Midi Input as shown in figure 1.

4) Close or minimize the Helix Native window.
4.1) Select your midi input device under Audio Input (figure 2)
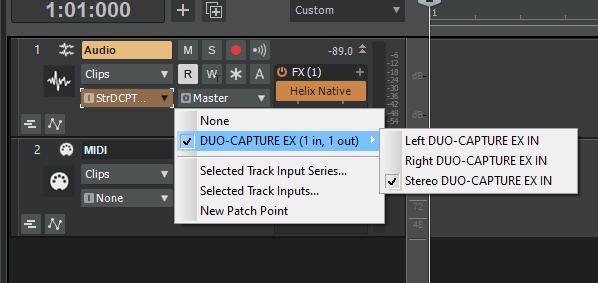
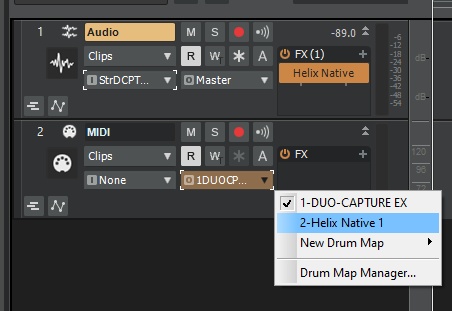
4.2) Select Helix Native as the output from the Midi track.
PROGRAMMING THE FCB1010
To select a snapshot in Helix Native, send it a MIDI CC#69 message.
1) Power On the FCB1010
2) Select the Bank for which you want to program footswitches with the UP and DOWN buttons (0-9)
3) Select the footswitch (FS) that you want to program and then press the DOWN button for 3 seconds.
4) The (switch 1 / switch 2) green led should be blinking under Preset Configuration.
5) Press the UP button. The Preset Configuration “SELECT” LED should turn ON.
6) Enter SYSEX SEND mode.
6.1) FS6 LED should be ON. If not, press and hold FS6 until it is on
6.2) Once FS6 LED is ON press FS6 again so that the LED is blinking.
7) Entering the midi command and CC
7.1)Press the UP button. The Preset Configuration “Number” LED should now be on. Press FS6 and then FS9. The number 69 should now be displayed.
7.2) Press the UP button. The Preset Configuration “Value 1” LED should be on. Press the Value for the Snapshot that you want to recall for that FS that you are programming. Value 0 will recall Snapshot 1, Value 1 will recall Snapshot 2, Value 2 will recall Snapshot 3, and so on.
7.3) Press the UP button once more – the Preset Configuration “SELECT” led should be ON
7.4) Press and hold the DOWN button for 3 seconds to complete programming for that FS.and return to normal mode.
Repeat steps 3 thru 7 for each FS that you want to program.